Adaptive Cards for Power BI is a simple concept that is designed to be easily implemented in existing Power BI solutions. It uses a Custom Visual that is a combination of both Card and Slicer utilising PowerBi's strengths in mixing and matching visual components. Templating is a new feature of Adaptive Cards and this is used to bind Power BI data by name to the Card. The visual is designed to be compliant to Microsoft standards for Power BI visuals, and we will be initiating the process to add the Adaptive Card visual to the App Store.
Cards can be designed using the Adaptive Card Designer, this visual provides basic field binding functionality and is not yet enabled for binding repeating columns of data. The visual will display cards associated with a category if your category has multiple values you will have multiple cards. If you have multiple cards, you can then use the visual as a slicer to select a single value. Single value cards can be used to produce more creative KanBan and KPI type cards than existing visuals, they are simpler to create than HTML formats and reusable in other contexts such as Outlook and Teams, of any web-based product.
Let's start with a simple card and see how we load the card and bind data to it. This is a simple card that we will use the display members of the Queensland State Parliament as a tooltip on a Power BI Map.
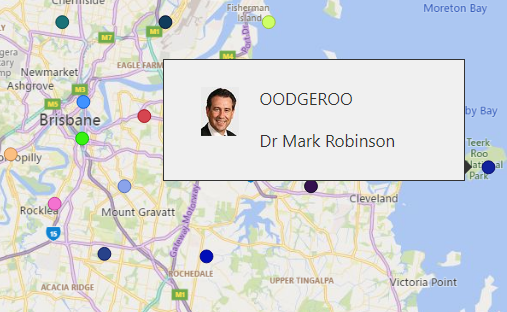
This is a nice simple tooltip, with an attractive thumbnail image. This pattern is very recyclable as well, thumbnails can be handy for product identification.
The cards itself is fairly simple, this is a JSON format, so it is well supported by text editors and familiar to many people.
{
    "type": "AdaptiveCard",
    "$schema": "http://adaptivecards.io/schemas/adaptive-card.json",
    "version": "1.3",
    "body": [
        {
            "type": "Container",
            "items": [
                {
                    "type": "ColumnSet",
                    "columns": [
                        {
                            "type": "Column",
                            "width": "stretch",
                            "items": [
                                {
                                    "type": "Image",
                                    "url": "${Thumbnail}",
                                    "size": "Medium"
                                }
                            ],
                            "height": "stretch"
                        },
                        {
                            "type": "Column",
                            "width": 50,
                            "items": [
                                {
                                    "type": "TextBlock",
                                    "text": "${Electorate}",
                                    "size": "Medium"
                                },
                                {
                                    "type": "TextBlock",
                                    "text": "${Member}",
                                    "size": "Medium"
                                }
                            ]
                        }
                    ]
                }
            ]
        }
    ]
}
The most important thing here are the bindings:
- ${Member}
- ${Electorate}
- ${Thumbnail}
Thumbnail is a URL for an image, this can be a file or just a data URI in the table, see this article on the data URI scheme for more detail. Data URIs are handy for thumbnails.
We like to put our Adaptive Card Templates in Azure Storage where Power BI can fairly readily load them by URL into a table. This is a standard piece of Power Query that uses a 'FilePath' parameter for the URL:
let
    Uri = Uri.Parts(FilePath),
    Host = "https://" & Uri[Host],
    Storage = AzureStorage.Blobs(Host),
    Container = Text.BetweenDelimiters(Uri[Path],"/","/"),
    Files = Storage{[Name=Container]}[Data],
    FileName = Text.AfterDelimiter(Uri[Path],"/",1),
    ThisRow = Table.SelectRows(Files, each ([Name] = FileName)),
    ThisBinary = ThisRow{[Name=FileName]}[Content],
    ThisCard = Lines.ToText(Lines.FromBinary(ThisBinary))
in
    ThisCard
This query will load the Card into a column in a table with the same name as the query. Our Query is called 'LoadCard' and the column then is also 'LoadCard'. Change the 'FilePath' parameter for different cards, If you load more than one card to a PowerBI solution, use a separate name for each path and query.
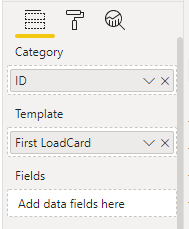
The steps to use a card are this:
- Add the AdaptiveCards Visual to your page
- Add category to the Fields Pane, this in the 'granularity' of your card
- Add the Card from the query to the Card Template field
This will give you a visual that looks like this:
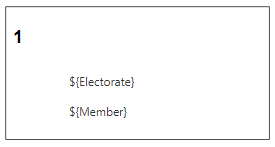
your field Pane will look like this.
You can hide the category using the format pane, and then add the fields to complete the Card. Remember binding is by name, the 'Thumbnail' field is hiding it's name, but you can see the other names, this is what the completed card will look like:

and the fields like this:

Did I mention that you should rename and fields that have the wrong name? Rename by right clicking the field on the field pane and selecting rename.
There is a detailed walkthrough in this video.
Download the Visual from the Downloads page.
If you want to know more DM on Twitter to use the Contact page or just reach out if you have any questions.
Find out more about Adaptive Cards